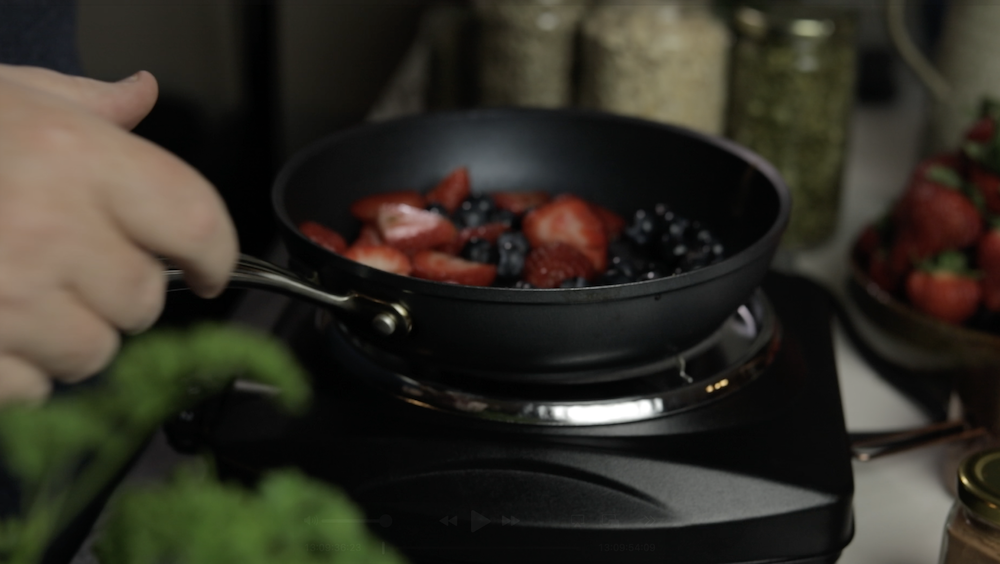
The idea started practically. One Saturday afternoon, a big pot of guajillo-ancho sauce on the stove, the apartment smelling like toasted chiles and caramelised onion, and the realisation that this sauce was good enough to make the entire week interesting.
Birria as a concept is so much more than a taco filling. The sauce itself, that deeply smoky, slightly sweet, chile-forward liquid that coats everything it touches, is a foundation. It has enough character to carry noodles, glaze root vegetables, deepen a cheese sauce, and hold eggs. You just have to understand what it needs from dish to dish: sometimes thinner, sometimes reduced and sticky, sometimes folded in gently so it deepens rather than takes over.
This vegetarian version borrows the structural logic of birria without trying to replicate the braised meat version. The chiles are the star. Guajillo gives you that clean, fruity heat. Ancho brings body and a dark, almost chocolatey earthiness. Soy sauce adds umami depth where the meat would normally contribute it. Brown sugar keeps everything from tilting too bitter. Optional ginger gives the whole thing a faint warmth that lingers without being identifiable.
What follows is the mother birria sauce first, in full detail. Then six completely different recipes and an updated hollendaise. Each use it in different ways Throughout the week The sauce keeps well, it freezes even better, and it makes the kind of cooking week where you actually look forward to dinner.
The Mother Sauce: Smoky Vegetarian Birria
Flavour profile: Fruity guajillo heat, dark ancho earthiness, soy umami, quiet sweetness, smoke that builds slowly at the back of the throat.
The first time you make this sauce, give it your full attention. Not because it’s difficult, but because you’ll want to understand what’s happening at each stage. Toasting the dried chiles is the most important step and also the one most often rushed. You’re looking for a change in aroma, a deepening from dusty dried pepper to something roasted and alive. The moment you smell that shift, it’s done.
Soaking the chiles afterward softens them completely and draws out their colour. The soaking liquid is deeply flavoured and absolutely goes into the blender with everything else.
Ingredients:
- 5 dried guajillo chiles, stems and seeds removed
- 3 dried ancho chiles, stems and seeds removed
- 6 garlic cloves, unpeeled
- 1 medium white onion, roughly chopped
- 400g canned whole tomatoes, drained
- 3 tbsp soy sauce (not low-sodium)
- 2 tbsp brown sugar, packed
- 1 tsp smoked paprika
- 1 tsp ground cumin
- 1/2 tsp dried oregano (Mexican if you have it)
- 1/2 tsp chili flakes, or to heat preference
- 1/4 tsp cinnamon
- 1 tbsp neutral oil
- Salt to finish
- Optional: 1 tsp fresh ginger, grated
- Optional: 1/2 tsp black pepper
Method:
- Place a dry skillet over medium heat. Add the guajillo and ancho chiles in a single layer and toast for about 30 to 40 seconds per side. Press them lightly with a spatula. You want them fragrant and slightly puffed but not blackened. Remove and cover with 2 cups of just-boiled water. Weigh them down with a small plate if they float. Soak for 20 minutes until fully soft.
- In the same dry skillet, add the unpeeled garlic cloves and toast over medium heat, turning occasionally, until the skins are blistered and the garlic is soft inside, about 8 to 10 minutes. Cool briefly, then peel. The garlic should be golden and jammy inside.
- In a saucepan with a splash of oil, sauté the chopped onion over medium-high heat until it begins to colour at the edges, about 10 minutes. You want some browning here. Add the garlic and cook another 2 minutes.
- Drain the soaked chiles, reserving the soaking liquid. Add the chiles, onion and garlic mixture, drained tomatoes, soy sauce, brown sugar, smoked paprika, cumin, oregano, chili flakes, cinnamon, and ginger if using to a blender. Add 1 cup of the reserved soaking liquid. Blend on high until very smooth, at least 2 minutes.
- Pass the sauce through a fine mesh strainer, pressing firmly to extract all the liquid. Discard the solids. Return the strained sauce to a medium saucepan over medium heat and simmer for 15 to 20 minutes, stirring occasionally, until it deepens in colour and coats a spoon. Season with salt. The sauce should be savoury, slightly sweet, smoky, and complex.
Tips: Taste the sauce after simmering. If it reads flat, it needs salt. If it reads too bitter, add another half teaspoon of brown sugar. If the heat is too much, a small spoon of tomato paste smoothed in will round it out without losing the depth.
Storage: Keeps in the refrigerator for up to 7 days in a sealed jar. The flavour improves noticeably on day two. Freeze in 1-cup portions in zip-lock bags laid flat for up to 3 months. Thaw overnight in the fridge.
For recipes that call for birria broth, dilute 1 cup of sauce with 2 cups of good vegetable stock and taste. For recipes calling for a thick glaze, reduce the sauce in a small pan until it coats a spoon thickly and turns slightly sticky at the edges.
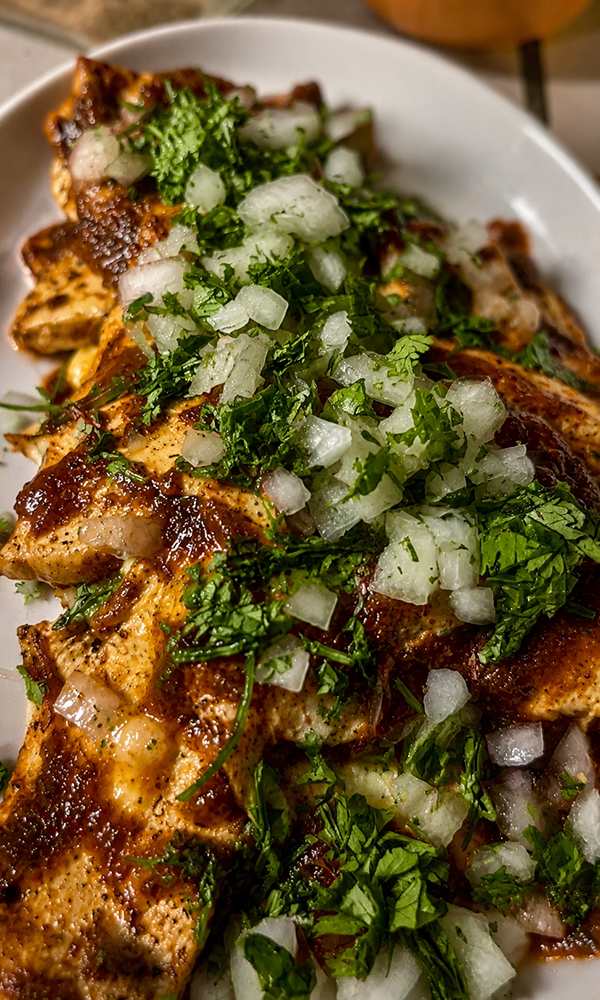
Meal One: Crispy Veggie Birria Tacos
The taco version was the first thing made with this sauce, and it took a few rounds to get right. The initial instinct was to treat it like traditional birria, dunking the tortillas fully into the sauce before hitting the pan. The result was soggy, heavy, falling apart before they reached the plate. Good flavour, bad structure. The second attempt was better: a light brush of sauce on the tortilla instead of a full dip, crispy tofu inside rather than saucy braised anything, and a hard commitment to cooking the taco long enough that the cheese actually fused to the shell.
The tortilla question matters more here than it might seem. Corn tortillas absorb sauce differently than flour. Corn holds its structure better with moisture but chars faster at the edges, which actually looks excellent and adds a slightly bitter, smoky note that works with the birria. Flour tortillas are more forgiving for beginners and crisp up into something almost flaky if you cook them long enough. Both work. Corn gives you a more traditional result. Flour gives you more crust.
Ingredients (serves 2, makes 4 to 6 tacos):
- 4 to 6 small flour or corn tortillas
- 200g firm tofu, pressed and cubed or crumbled
- 1/2 cup birria mother sauce, divided
- 100g mozzarella or Oaxaca-style cheese, grated or pulled into strands
- Half a white onion, finely diced
- 3 green onion stalks, sliced
- 1 tbsp neutral oil for frying tofu
- 1 tbsp cornstarch
- Salt, black pepper
To serve: extra birria sauce on the side for dipping, lime wedges, optional sour cream
Instructions:
- Press the tofu very dry between paper towels. Cut or crumble into small pieces, roughly 1 to 2cm. Toss with the cornstarch, salt, and black pepper. Heat the oil in a non-stick pan over medium-high heat and fry the tofu undisturbed for 3 to 4 minutes until deeply golden on the base, then toss and crisp the remaining sides. The tofu needs to be properly crispy before any sauce goes near it, otherwise it softens and becomes spongy inside the taco.
- Once the tofu is crispy, reduce the heat to medium-low and add 3 tablespoons of the birria sauce directly to the pan. Toss quickly to coat, cooking for just 60 seconds. You want the sauce to cling and caramelise slightly around the tofu without steaming it soft. Remove from heat immediately and set aside.
- Lay the tortillas on a flat surface. Using a pastry brush or the back of a spoon, brush a thin, even layer of birria sauce across one side of each tortilla. Don’t soak them. You want flavour and a slight stain of colour, not wet dough.
- Heat a dry skillet over medium heat. Place a tortilla sauce-side down in the pan. Add a small handful of cheese to one half of the tortilla, spreading it close to the edges. Add a spoonful of the birria tofu on top of the cheese. Fold the tortilla closed and press lightly. Cook for 2 to 3 minutes until the underside is deeply golden, then flip carefully and cook for another 2 minutes. The cheese should be fully melted and visible at the seam.
- Scatter the diced white onion and green onion over each taco immediately after cooking. Serve with extra birria sauce alongside for dipping and lime wedges.
On the common mistakes: Too much sauce on the tortilla is the main one. It seems like it should make the taco taste more like birria, but what it actually does is create a steaming effect inside the fold that softens the tortilla completely. A thin brush is enough. The dipping sauce on the side handles the rest. The other one is pulling the tacos off the heat too early. The cheese needs time to fully melt and the tortilla needs time to genuinely crisp. A taco that’s pale and pliable when it comes off the heat will be soft and slightly greasy by the time it reaches the table.
Variations: A spoonful of sour cream or labne inside before folding adds a cooling layer. Pickled jalapeños or thinly sliced fresh serrano for more heat. The leftover birria tofu from this recipe also works well on top of the ramen later in the week.
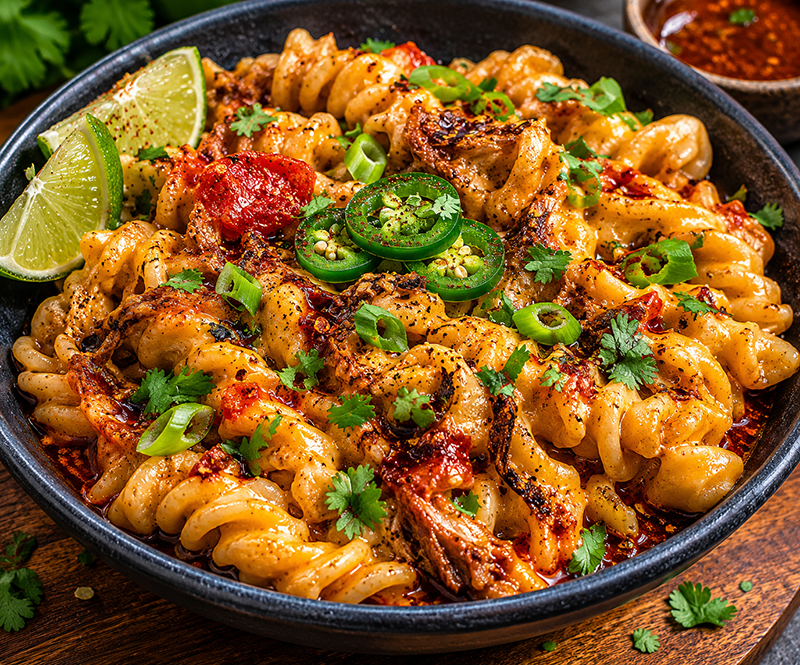
Meal Two: Birria Rice Noodle Ramen
This is what you make the first or second night, when the sauce is fresh and you want something that uses it as a broth rather than a glaze. The idea was simple: thin the birria sauce significantly, add crispy tofu and roasted sweet potato, and serve it over rice noodles. What came out was a bowl that sits somewhere between a Mexican and East Asian pantry, in the best possible way.
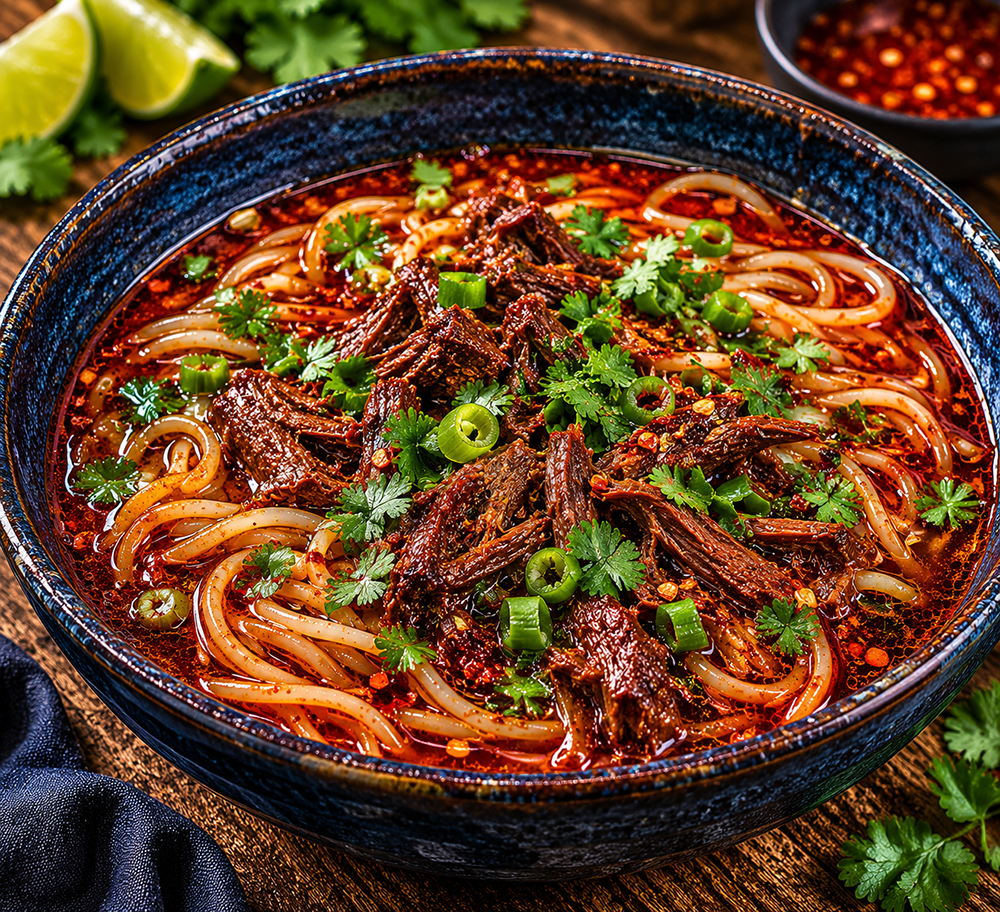
The sweet potato is essential. Roasted until caramelised at the edges, it brings a natural sweetness that softens the smokiness of the birria and gives the broth somewhere to go texturally. Crispy tofu pressed and pan-fried before any sauce touches it holds its structure in the broth, giving you bite contrast against the soft noodles. And the rice noodles should be cooked separately, always. Cooked directly in the broth they turn gummy within minutes, absorbing the broth in a way that’s unappealing and leaves nothing for the bowl.
Ingredients (serves 2):
- 1 cup birria mother sauce
- 2 cups vegetable stock
- 200g firm tofu, pressed and cubed
- 1 medium sweet potato, peeled and diced 2cm
- 180g dried rice noodles (medium thickness)
- Half a white onion, thinly sliced
- 3 green onion stalks, sliced
- 2 tbsp neutral oil for frying
- 1 tbsp cornstarch
- Salt, white pepper
- Optional: chile crunch oil to finish
- Optional: lime wedges
Instructions:
- Preheat the oven to 210C. Toss the sweet potato cubes in a little oil, season with salt, and roast on a lined tray for 25 to 30 minutes until golden at the edges and tender inside. You want actual caramelisation on at least one side of each cube, not just soft steaming.
- Press the tofu dry between paper towels, really pressing hard for a couple of minutes. Cut into 2cm cubes and toss with the cornstarch, salt, and a pinch of white pepper. Heat the 2 tablespoons of oil in a non-stick pan over medium-high heat. Fry the tofu undisturbed for 3 to 4 minutes per side until deeply golden and crisp. Resist moving it. Set aside on paper towels.
- In a medium saucepan, combine the birria sauce with the vegetable stock. Bring to a simmer and taste. The broth should be smoky and savoury but not thick. If it reads too intense, add a splash more stock. Add the sliced onion and simmer gently for 5 minutes until slightly softened but still with a little structure.
- Cook the rice noodles in a separate pot of boiling salted water according to the package directions, then drain and rinse briefly under cool water to stop them sticking. Divide into two bowls immediately.
- Ladle the hot birria broth and onions over the noodles. Top with the crispy tofu and roasted sweet potato cubes. Finish with sliced green onion, a drizzle of chile crunch if using, and a squeeze of lime.
Variations: A soft-boiled egg marinated in soy sauce and mirin adds richness if you want more protein. A spoonful of white miso whisked into the broth before serving adds another layer of depth without changing the profile dramatically. Thin rice vermicelli works well here too, though medium noodles hold up better against the bold broth.
Meal Three: Whole Roasted Potatoes with Birria Glaze
This recipe came out of having small yellow potatoes sitting on the counter and not wanting to smash or slice them. The whole-potato approach demands patience but it repays it completely. You parboil them first until just tender, then let them steam-dry completely before coating them in a reduced birria glaze and roasting until the skins blister and char slightly at the edges.
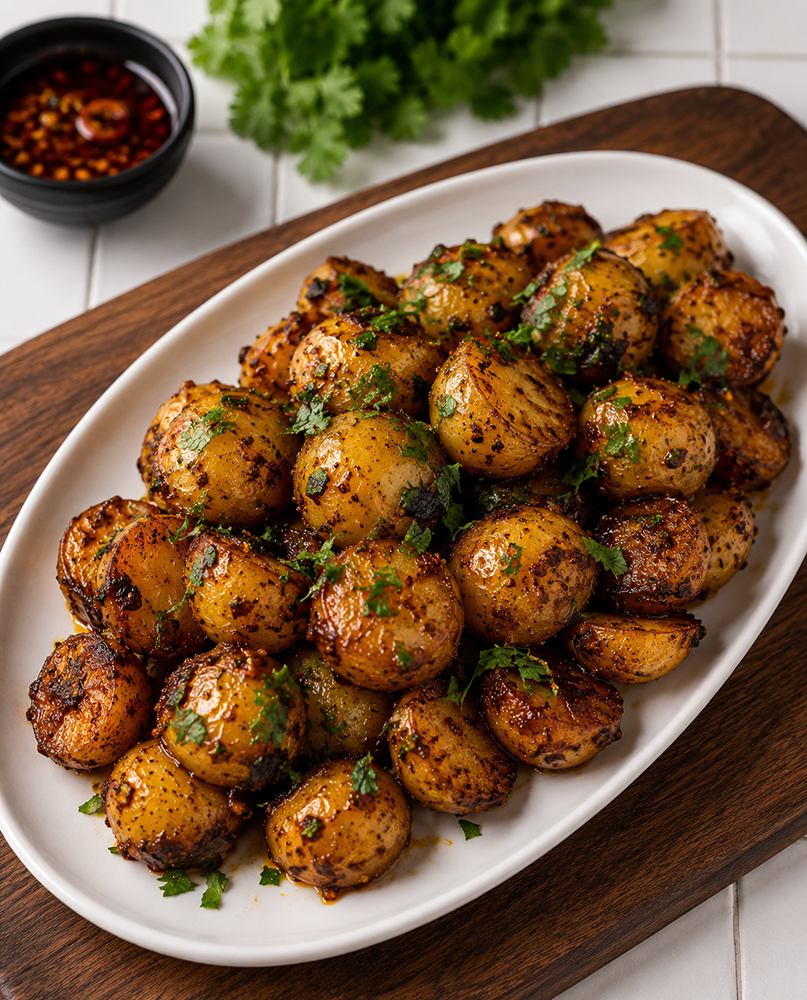
The interior of a small potato roasted this way stays dense and creamy, almost like roasted garlic in texture, while the outside takes on this lacquered, slightly sticky quality from the birria reduction. The sugars in the sauce caramelise against the potato skin and create a layer of deep flavour that smashing or halving would scatter and lose. Goat cheese crumbled on at the end is optional but genuinely excellent, the tang cutting against the sweetness of the glaze.
Ingredients (serves 2 as a side, 1 as a main):
- 500g small yellow potatoes, similar in size
- 3 tbsp birria mother sauce
- 1 tbsp neutral oil
- Salt
- 3 green onion stalks, sliced thin
- Optional: 50g soft goat cheese
- Optional: flaky sea salt to finish
Instructions:
- Place the whole potatoes in a pot of cold salted water. Bring to a boil and cook until a skewer or fork passes through with just a little resistance, about 15 minutes depending on size. They should not be completely soft. Drain and spread on a wire rack or a clean towel. Let them steam-dry completely, at least 15 minutes. This step is not negotiable if you want good skin.
- While the potatoes dry, reduce the birria sauce in a small pan over medium heat with a teaspoon of oil, stirring occasionally, until it thickens noticeably and pulls away from the pan’s edges slightly. You want it thick enough to coat a spoon completely and turn a little sticky. Remove from heat and cool for a few minutes.
- Preheat the oven to 220C. Toss the dry potatoes gently with the reduced birria glaze until each one is coated. Use your hands or a spoon, being careful not to break the skins. Arrange on a lined baking tray with a little space between each one.
- Roast for 25 to 30 minutes, turning once halfway, until the skins are blistered and dark in spots and the glaze has set and caramelised against the surface. The potatoes should look lacquered and slightly charred at the contact points.
- Transfer to a plate. If using goat cheese, crumble it over immediately while the potatoes are hot so it softens slightly against them. Scatter with green onion and flaky salt.
Tip: Small uniform potatoes matter here because they’ll all finish roasting at the same time. If your potatoes vary significantly in size, halve the largest ones before parboiling so everything cooks evenly.
Serving suggestions: Works well alongside a simple green salad dressed with nothing more than lemon and olive oil. A drizzle of sour cream or labne after plating adds cooling creaminess against the heat of the glaze.
Meal Four: Smoky Birria BBQ Cauliflower Steak
Cauliflower steak has a credibility problem that mostly comes from people not cooking it long enough or hot enough. Done correctly, roasted with enough fat and high enough heat, the cross-sections caramelise into something almost meaty in texture, with crispy florets at the edges and a denser interior. What the birria glaze does here is transform the sauce from something Latin-inflected into something that reads more like a smoky BBQ finish.
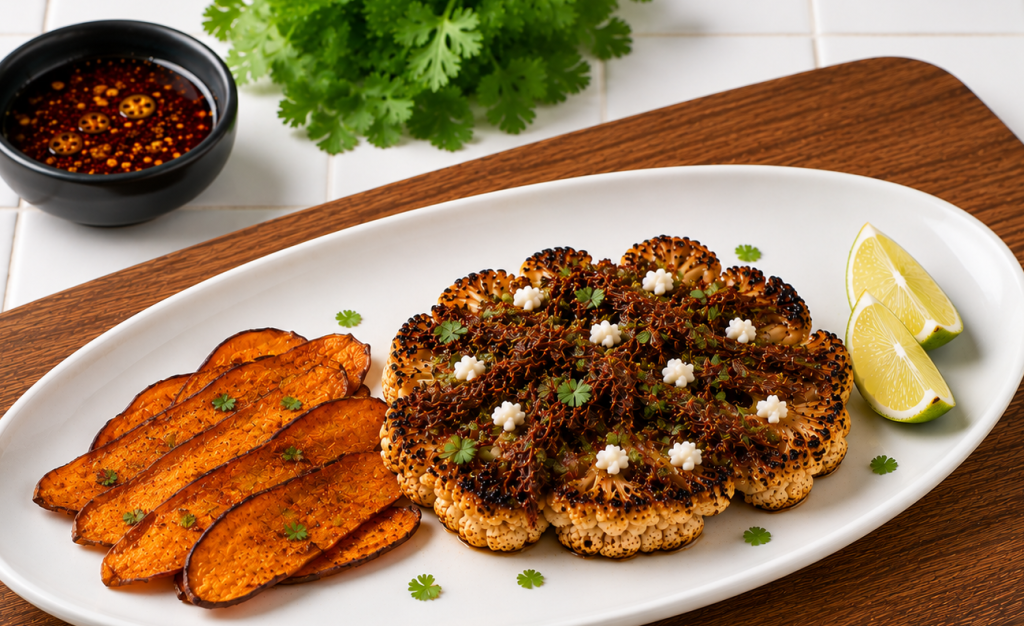
The addition of extra brown sugar and soy sauce to reduce the birria concentrates its smokiness and creates that sticky, thick BBQ-adjacent glaze. Apply it in layers during roasting rather than all at once. The first layer sets and caramelises. The second layer applied near the end glazes on top of that, creating depth. A final hit under the broiler or grill gets you that slightly charred, lacquered surface that makes this recipe worth making for guests.
Ingredients (serves 2):
- 1 large cauliflower head
- 4 tbsp birria mother sauce
- 1 tsp additional brown sugar
- 1 tsp additional soy sauce
- 2 tbsp olive oil
- Salt, black pepper
- Optional: 50g soft goat cheese
- Optional: green onion, pomegranate seeds
Instructions:
- Remove the outer leaves from the cauliflower. Place it stem-side down and slice two 3 to 4cm thick steaks from the centre. You’ll have florets left over from the sides; save them for another purpose. Pat the steaks dry with paper towels.
- In a small bowl, mix the birria sauce with the additional brown sugar and soy sauce until combined. Taste it. It should be very thick, very smoky, and aggressively flavoured. This concentration is intentional because it’ll spread thinly and the cauliflower will absorb it during roasting.
- Preheat the oven to 220C. Heat an oven-safe skillet or heavy pan over high heat with the olive oil until it just begins to smoke. Sear the cauliflower steaks for 2 minutes per side until golden brown on the flat surfaces. Season with salt and pepper.
- Brush the top surface of each steak generously with the birria BBQ glaze. Transfer the pan directly to the hot oven and roast for 15 minutes.
- Pull out the pan, flip each steak, brush the new top surface again with glaze, and return to the oven for another 10 minutes. The glaze should look sticky and deeply coloured. For the final 2 to 3 minutes, switch to the broiler or grill setting to char the surface slightly and set the glaze.
- Remove from the oven and rest for 3 minutes. The glaze will firm up slightly as it cools. If using goat cheese, crumble it over now so it softens against the heat. Finish with green onion and pomegranate seeds if using.
Meal Five: Birria Mac and Cheese
This is the recipe that surprised people most when I first made it. Mac and cheese with a birria sauce in it sounds like it should be confused, like two strong flavours fighting for dominance. What actually happens is that the birria acts as a flavour deepener rather than a lead note. You add it carefully and in proportion, and what it does is give the cheese sauce a smokiness and a slight complexity that a plain béchamel can never achieve.
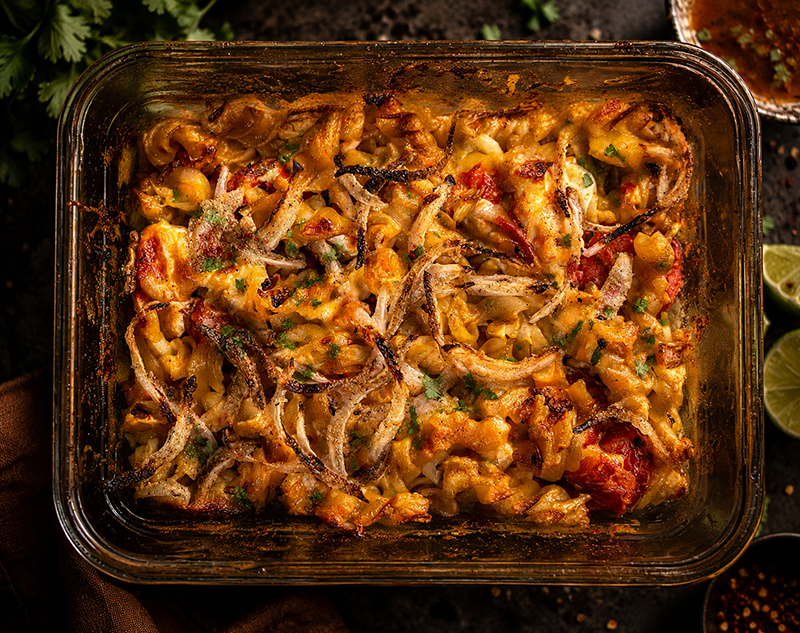
The cheese structure is important here. Cheddar is the anchor and should make up the bulk of your cheese weight, sharp and tangy and the primary flavour. Mozzarella contributes stretch and melt without a strong flavour of its own. Goat cheese, added last in small amounts, introduces an acidic brightness that prevents the whole dish from reading as flat or too rich. The drained stewed tomatoes folded through the pasta add little pockets of acidity and fruitiness that cut through the fat of the sauce in a way that fresh tomatoes simply wouldn’t.
And then the onions on top. Thinly sliced, laid over the whole surface before the dish goes into the oven, they crisp up beautifully as the mac bakes, turning from pungent to sweet to almost caramelised at their edges. It sounds like a small detail. It isn’t. The contrast between the crispy onion surface and the creamy, smoky cheese underneath is what makes the whole dish feel finished.
Ingredients (serves 4):
- 350g macaroni or short pasta
- 3 tbsp unsalted butter
- 3 tbsp plain flour
- 2.5 cups whole milk, warm
- 200g sharp cheddar, grated
- 100g mozzarella, grated
- 75g soft goat cheese, crumbled
- 3 tbsp birria mother sauce
- 200g canned stewed tomatoes, drained well
- 1 large white onion, halved and very thinly sliced
- 1 tsp Dijon mustard
- Salt, black pepper, white pepper
- Optional: breadcrumbs for extra crust
Instructions:
- Cook the pasta in heavily salted boiling water for 2 minutes less than the package directions. You want it undercooked and still slightly chalky at the centre. Drain and toss with a little oil to stop sticking. Set aside.
- Preheat the oven to 190C. Melt the butter in a medium heavy saucepan over medium heat. Add the flour and whisk constantly for 90 seconds until it smells slightly nutty and looks pale golden. Add the warm milk a third at a time, whisking vigorously between each addition to prevent lumps. Cook for 5 to 6 minutes total, whisking regularly, until it coats the back of a spoon.
- Remove from heat. Add the Dijon, then the cheddar and mozzarella in two batches, stirring until each addition is completely melted before adding the next. Season generously with salt and both peppers.
- Stir in the birria sauce one tablespoon at a time, tasting between each addition. You’re looking for the sauce to deepen and take on smokiness without the chile flavour becoming the primary note. For most palates, 2 to 3 tablespoons is right. Stir in the goat cheese last, allowing it to melt partially but not completely. Some small pockets of tang should remain.
- Fold the cooked pasta into the cheese sauce, then gently fold in the drained stewed tomatoes, trying to keep some of them intact rather than crushing them completely. Transfer to a baking dish.
- Arrange the thinly sliced onion evenly over the entire surface of the mac, covering it generously. Scatter breadcrumbs over if using. Bake for 25 to 30 minutes until the edges are bubbling, the cheese is visibly set, and the onions on top have coloured, softened, and crisped at their thinner edges.
- Rest for 10 minutes before serving. The dish needs this time to set into something that holds its shape rather than running immediately when you serve it.
Tip: Drain the canned tomatoes very thoroughly, pressing gently in a strainer. Excess liquid will thin the cheese sauce as the mac bakes. If you want more pronounced tomato flavour, a light squeeze of tomato paste into the cheese sauce before the birria works well.
Variations: Gruyère in place of half the cheddar makes the sauce more complex and slightly nuttier, though the birria flavour becomes less distinct. This reheats well the next day from cold; add a splash of milk to the portion before microwaving to bring the sauce back.
Meal Six: Birria Shakshuka
Shakshuka is already a strong-flavoured egg dish, tomato and spice and olive oil. Adding birria sauce to the base transforms it into something darker and smokier while keeping the same fundamental logic: eggs poached directly in a thick, deeply seasoned sauce, served with bread for mopping. This version leans into that smokiness and adds goat cheese at the end, the tang cutting against the heat of the birria in a way that feels genuinely considered.
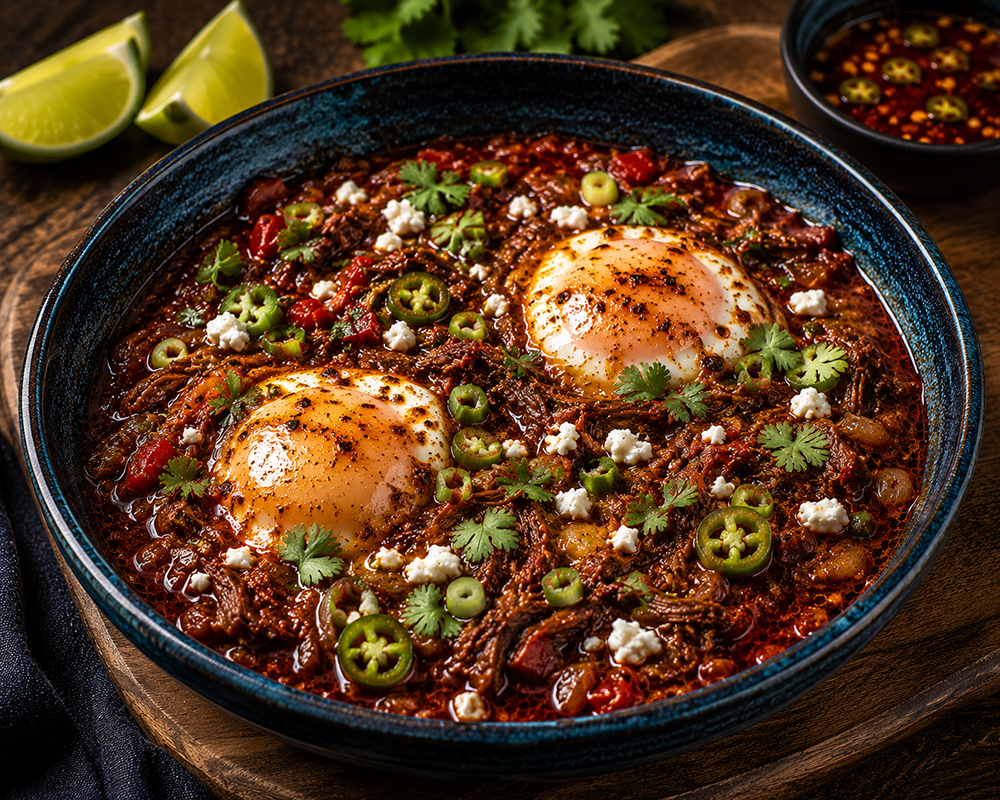
The key to this dish is the sauce consistency before the eggs go in. It needs to be thick, thick enough that you can make a hollow in it with a spoon and the hollow holds its shape for a few seconds before the sauce slowly fills back in. Too thin and the egg whites spread everywhere, taking too long to set, leaving you with hard yolks by the time the whites are cooked. A thick sauce creates the ideal environment: the eggs nestle into it, the whites set from the surrounding heat, and the yolks stay just barely set, still with that orange, jammy quality.
This is a breakfast or brunch dish that takes about 20 minutes from cold sauce to table, which puts it firmly in the category of things worth making on a slow weekend morning. The birria base made earlier in the week means the flavour work is already done.
Ingredients (serves 2):
- 1 cup birria mother sauce
- 200g canned stewed tomatoes, drained and roughly chopped
- Half a white onion, finely diced
- 4 large eggs
- 1 tbsp olive oil
- 60g soft goat cheese, crumbled
- 3 green onion stalks, thinly sliced
- Salt, black pepper
- Optional: pinch of chili flakes
- Flatbread, sourdough, or good crusty bread to serve
Instructions:
- In a medium oven-safe skillet, heat the olive oil over medium heat. Add the diced onion and cook for 6 to 8 minutes until soft, translucent, and starting to look golden at the edges. Season with a pinch of salt.
- Add the birria sauce and the drained, chopped stewed tomatoes. Stir to combine. Simmer over medium heat for 8 to 10 minutes, stirring occasionally, until the sauce has thickened and darkened. If you drag a spoon through the sauce, the line should hold for 2 to 3 seconds before filling back in. If it fills immediately, keep cooking. Add chili flakes now if you want more heat.
- Use the back of a spoon to make four shallow hollows in the sauce, spacing them apart. Crack one egg into each hollow carefully. Season the eggs lightly with salt and pepper.
- Cover the pan with a lid and cook over low heat for 5 to 7 minutes, checking frequently. You want the whites completely set and opaque, and the yolks still slightly soft and dark orange at the centre. Every stove runs differently, so check at 4 minutes and every 30 seconds after.
- Remove from heat. Crumble the goat cheese over the eggs and sauce immediately. Scatter green onion generously over everything. Serve directly from the pan with plenty of bread on the side.
Tip: If you prefer firmer yolks, transfer the pan to a 180C oven after adding the eggs instead of covering it on the stovetop. The ambient heat sets the yolks more gently and evenly without drying out the sauce surface. Check at 6 minutes.
Variations: Feta works in place of goat cheese if that’s what you have, though it brings more salt, so taste the sauce before seasoning the eggs. A handful of baby spinach wilted into the sauce just before the eggs go in adds colour and a mild bitterness that works well against the smokiness. For two hungry people, five eggs rather than four is the right call. Warm the flatbread or toast directly over the gas flame for 20 seconds per side for a little char that matches the mood of the dish.
Meal Seven: Sunday Brunch Eggs and Biscuits with Smoky Birria Hollandaise
Hollandaise is one of those sauces that feels more intimidating than it actually is, and once you understand its logic it becomes something you can pull together in about ten minutes with a bowl over simmering water and a whisk. The classic version gets its heat from cayenne, a clean, sharp spike at the finish. Swapping that out for birria sauce changes the character of the whole thing. The heat is still there but it’s layered now, smokier and more complex, with that ancho earthiness sitting underneath the richness of the butter and yolk.

The key is adding the birria carefully and in small amounts. Hollandaise is an emulsion and it’s delicate. Too much liquid of any kind and it breaks. A teaspoon at a time, whisked in after the sauce has formed, is the right approach. You’re seasoning with it more than building the flavour from it. The result reads as hollandaise first, smoky and slightly mysterious second.
This is a Sunday thing. It requires a little patience and the willingness to stand at the stove and whisk. It rewards both.
Ingredients (serves 2):
- 3 large egg yolks
- 115g unsalted butter, clarified or just melted and skimmed
- 1 tbsp cold water
- 1 tbsp lemon juice, plus more to taste
- 1 to 2 tsp birria mother sauce, or to taste
- Salt, white pepper
- 4 eggs, for poaching
- 4 biscuits or buttermilk scones, halved and toasted
- Optional: green onion, flaky salt, extra birria sauce to drizzle
Instructions:
- Clarify the butter by melting it gently in a small saucepan and skimming the white foam from the surface. Set aside somewhere warm. It should be liquid but not hot when it goes into the hollandaise.
- Set a heatproof bowl over a saucepan of barely simmering water, making sure the bowl doesn’t touch the water. Add the egg yolks and cold water to the bowl and whisk continuously for 3 to 4 minutes until the mixture thickens, turns pale, and holds a ribbon when the whisk is lifted. The yolks should roughly double in volume and look like a thick, airy custard. If the bowl feels very hot to the touch, pull it off the heat and keep whisking. Scrambled eggs are not hollandaise.
- Remove the bowl from the heat. Begin adding the warm clarified butter in a very slow, thin stream, whisking constantly. Start with just drops, then increase to a thin trickle as the emulsion builds. The sauce should thicken steadily as the butter goes in. If it starts looking greasy or separating, stop adding butter and whisk harder before continuing.
- Once all the butter is incorporated and the sauce is thick and glossy, whisk in the lemon juice and season with salt and white pepper. Now add the birria sauce one teaspoon at a time, whisking after each addition and tasting as you go. You’re looking for the hollandaise to take on a warmth and smokiness without losing its richness or breaking its texture. One teaspoon is subtle. Two is present and noticeable. More than that risks thinning the emulsion, so stop where it tastes right to you. Keep the bowl in a warm spot while you poach the eggs.
- Bring a wide saucepan of water to a gentle simmer. Add a splash of white vinegar. Crack each egg into a small cup first, then slide it into the water near the surface. Poach for 3 minutes for soft yolks. Remove with a slotted spoon and rest briefly on a folded paper towel.
- Toast the biscuit halves until golden and slightly crisp at the cut surface. Place two halves on each plate, top each with a poached egg, and spoon the birria hollandaise generously over everything. Finish with sliced green onion, a pinch of flaky salt, and a thin drizzle of extra birria sauce if you want the smokiness more visible on the plate.
On the hollandaise: If it breaks, don’t discard it. Start with a fresh egg yolk and a teaspoon of cold water in a clean bowl, whisk it over heat until it thickens slightly, then slowly whisk the broken sauce into it as if it were butter. It usually comes back together. This is good information to have before you need it.
Variations: A slice of ripe avocado between the biscuit and the egg adds creaminess that works well against the acidity of the hollandaise. Smoked paprika dusted lightly over the finished plate reinforces the smoky note without adding heat. The birria hollandaise also works well over roasted asparagus or on a simple vegetable hash if you want to take the brunch in a different direction.
A Week From One Pot
What a week of cooking from one sauce teaches you is mostly about restraint and proportion. The birria doesn’t work in every dish because it’s overpowering, but because it’s strong enough to hold itself as a background note when you use it correctly. In the mac and cheese, it’s a deepener. In the ramen, it’s a broth base. In the shakshuka, it’s the primary flavour vehicle. In the cauliflower and potatoes, it becomes a glaze with a character entirely its own. In the tacos, it’s both the seasoning and the dipping sauce, doing two different jobs at different intensities. And in the hollandaise, it replaces a single ingredient and quietly changes the personality of the whole sauce.
The exercise also clarifies something useful: a good mother sauce should be assertive and almost too flavourful on its own, because it’ll be diluted or shared with other strong ingredients in every application. If the sauce tastes balanced and mild straight from the pot, it’ll disappear in every dish you put it in. You want it to taste slightly intense, slightly complex, slightly like too much, because that’s exactly what you need once it meets everything else in the pan.
There’s a version of this for every season. Summer calls for the cauliflower steak served room temperature with something sharp and bright on top. Winter calls for the mac and cheese, eaten out of the baking dish on the couch. Autumn calls for the whole potatoes, earthy and sweet and lacquered in that dark glaze. The ramen works at any temperature, any time, when you want something brothy and warm and complicated without any real effort. The tacos are a Friday night thing, something to stand over the pan and eat immediately while the cheese is still pulling. The shakshuka is a quiet weekend ritual that starts to feel like something you own after the second or third time you make it. And the hollandaise is the Sunday send-off, a little more effort than the rest, and worth every minute of it.
Make the sauce on a Saturday. See where it takes you.s project. Note all these recipes are vegetarian! The sauce comes from Nickskitchen.com
NOTE: There are also a few other dishes you can make but I wanted to get this article in while the food was fresh in my mind. Here is a bonus chili recipe because why not!
Black Bean Birria Chili
Black bean chili has a tendency to taste like it’s trying to be something else. Too much cumin and it reads like taco seasoning. Too many tomatoes and it becomes a soup. The birria sauce fixes both of those problems at once because it already has the complexity built in. What you’re doing here is using it as the spice base rather than building a spice blend from scratch, which means the chili has depth from the first simmer instead of needing an hour to develop it.
Canned black beans work well here and there’s no shame in using them. Drained, rinsed, and added at the right stage they hold their shape and absorb the birria without turning to paste. If you do have the time and inclination to cook dried beans from scratch, the texture is noticeably better, firmer and creamier at the same time, and the cooking liquid adds another layer to the broth. But this is a chili, not a project, and the canned version is genuinely good.
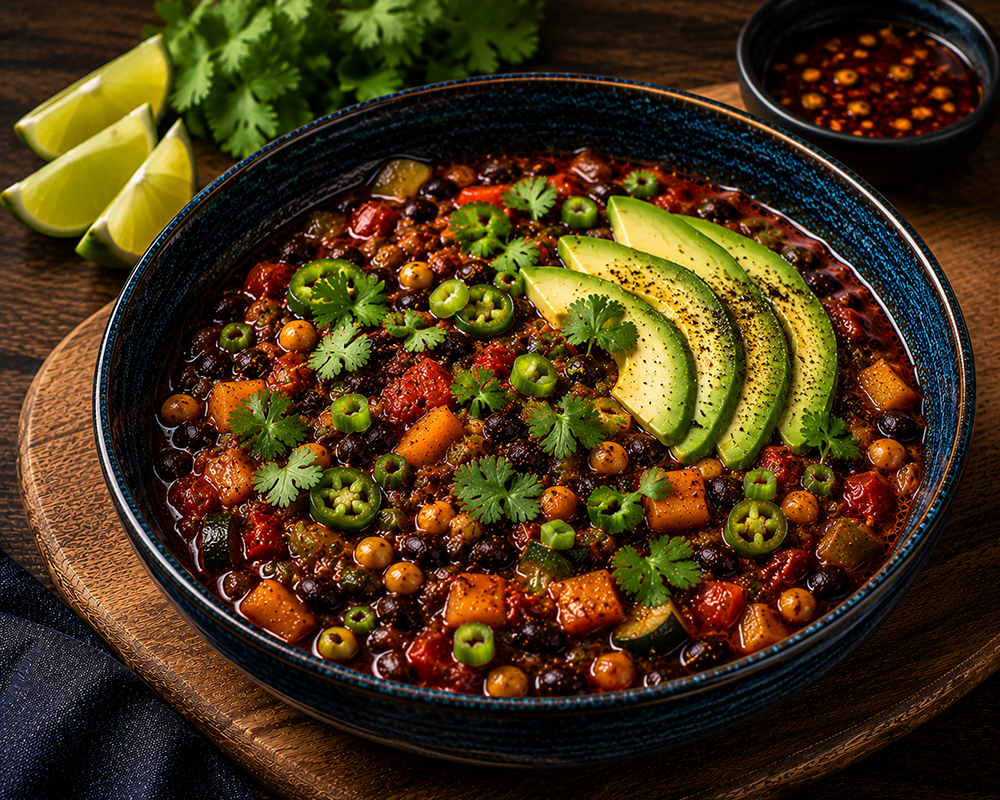
The jalapeños are important. They bring a fresh, grassy heat that the dried chile birria base doesn’t have on its own. Add them early for heat without sharpness, or late for that bright, raw edge. Both are correct depending on your preference.
Ingredients (serves 4):
- 2 x 400g cans black beans, drained and rinsed (or 400g dried black beans, soaked overnight and cooked until just tender)
- 1/2 cup birria mother sauce
- 400g canned whole tomatoes, crushed by hand
- 2 jalapeños, finely diced (seeds in for more heat, seeds removed for less)
- 1 medium white onion, diced
- 4 garlic cloves, minced
- 1 cup vegetable stock
- 1 tbsp neutral oil
- 1 tsp ground cumin
- 1 tsp smoked paprika
- Salt, black pepper
To serve: sour cream, sliced green onion, lime wedges, warm tortillas or cornbread, optional extra fresh jalapeño. I like fresh sliced avocado on mine and sometimes grated cheddar cheese.
Instructions:
- Heat the oil in a heavy-bottomed pot or Dutch oven over medium-high heat. Add the diced onion and cook for 8 to 10 minutes, stirring occasionally, until softened and starting to colour at the edges. You want some browning here. Add the garlic and jalapeños and cook for another 2 minutes until fragrant. If you want the jalapeño heat to mellow and integrate, this is the moment to add them. If you want them to stay bright and sharp, hold them back until step 3.
- Add the cumin and smoked paprika directly to the onion mixture and stir for 30 seconds until the spices are toasted and coating everything in the pot. This is a short step but it matters. Raw ground spices added to liquid taste flat. Thirty seconds of dry heat changes them.
- Add the crushed tomatoes with their juice and stir to combine, scraping up anything stuck to the base of the pot. Simmer for 5 minutes until the tomatoes have darkened slightly and the mixture looks jammy rather than wet.
- Add the birria sauce and vegetable stock. Stir well and bring to a simmer. Taste the base before the beans go in. It should be smoky, slightly spicy, and savoury. If it reads thin or one-dimensional, let it reduce for another 5 minutes uncovered before moving on. If you held back the jalapeños, add them now.
- Add the drained black beans. Stir gently to combine without breaking them up. Reduce the heat to medium-low and simmer uncovered for 20 to 25 minutes, stirring occasionally, until the chili has thickened and the beans have absorbed the colour and flavour of the birria base. The consistency should be thick enough that a spoon dragged through the pot leaves a trail that fills in slowly, not immediately.
- Taste and adjust. More salt if it reads flat. A small squeeze of lime if it needs brightness. Another teaspoon of birria sauce if you want more smoke. A pinch of chili flakes if the heat has faded more than you’d like.
- Serve in deep bowls with a spoonful of sour cream, sliced green onion, and lime wedges alongside. Warm tortillas or a wedge of cornbread on the side for the broth at the bottom of the bowl.
On the beans: If cooking dried beans from scratch, cook them in well-salted water with a halved onion and a couple of garlic cloves until just tender but not falling apart. Reserve a cup of the cooking liquid and add it in place of some of the vegetable stock. It thickens the chili naturally and adds a quiet earthiness that canned bean liquid can’t replicate.
On the jalapeños: One jalapeño gives you noticeable warmth. Two gives you genuine heat. If you’re serving people with different heat tolerances, dice one jalapeño in at step 1 and keep the second one sliced fresh on the table as a topping.
Leftovers: This chili is better the next day without exception. The birria flavour deepens overnight and the beans absorb more of the base. Reheat gently with a splash of stock if it’s thickened too much in the fridge. It also freezes well in portions for up to three months.
Variations: A small square of dark chocolate, around 70 percent, stirred in during the last five minutes of cooking adds a faint bitterness that rounds out the sweetness of the tomatoes without tasting like dessert. A drained can of fire-roasted tomatoes in place of the plain whole tomatoes pushes the smokiness further if your birria sauce has mellowed slightly from sitting in the fridge.
If you try any of these recipes, please comment below and let me know what you thought.
Watch for a full YouTube video to be released soon.